Video Compression
Size is the biggest problem with transmission of video over the web. Video materials that we captured into the computer from a camera or video are very big and have to be compressed. There are several types of compression which can be grouped by categories they are used for. There are therefore:
Divx/Xvid is compression whose quality and size are usually satisfactory for every user; however, materials in this format are still not compressed enough to be sent through the web. Of course, the longer the video, the greater the size of the compressed document. One flaw of these compressions is that it requires the installation of codecs (Divx/Xvid) in order for the compressed video to be able to be seen, which can sometimes pose a problem (Where can I find the codecs? Do I have the required codecs? etc.)
A very popular video compression format nowadays is a Microsoft product and it is free - WMV format (Windows media video). Compression done in this format is intended exclusively for web transfer, through e-mail, broadcast etc. A great advantage of this format lies in the fact that it does not require codecs. All you need are Windows and Windows Media Player, which is automatically installed with this operating system.
The next question is which program can compress it?
To make things simpler, program is a part of the Windows operating system package, so when Windows XP are installed Windows Movie Maker will also be installed on your computer. You can use this program to easily transfer your video into a .wmv format.

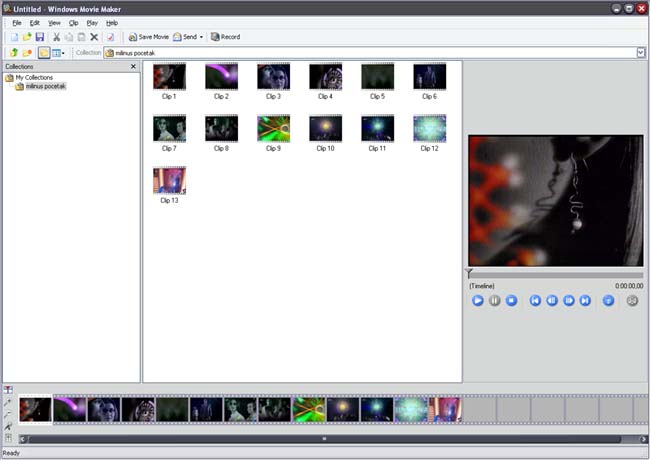
Once you’ve found Movie Maker on your disk (C:\Program Files\Movie Maker) and got it started, a very simple interface with four windows will open. The first window is for the setup of files with your materials. In our case we have only one. In the other window your material will be divided into several clips, while in the third you can look at your video material. The fourth window contains a bar in which you can edit your materials. This means that you can combine your materials with other materials or change the scene sequence.
Import all you video material into the Movie Maker by selecting File/Import. Clips are simply dragged and dropped into the Movie Maker.

Once you have put together the materials which are ready for compression, you can look at them by selecting the part you wish to see (in the editing bar, since you wish to see the already edited materials), use ctrl-A shortcut or select Edit/Select All in the drop-down menu and click on play.
You like what you’ve put together and everything is ready for exporting i.e. compression into the .wmv format.

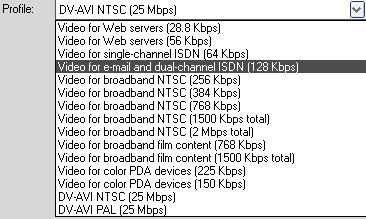
Select File/Save Movie in the drop-down menu, after which a window with compression setting will open. Select “Other" and set the type of video transmission you will be sending your material to.

If you are sending your video through e-mail, select “Video for e-mail" which will result in extensive compression and quality loss (which is exactly what compression does – “compresses” quality). If you try to select several types of compression, you will notice how the picture size changes.


These parameters contain two more excellent pieces of information – the size of the compressed video and the time necessary for its download (from the Internet, e-mail etc) with different types of connection. This will enable you to see how long it will take the person you are sending the video to or you to open the video with the connection you have.
- This information contains data about the author, which you do not have to fill in; however, if you want to, you can.
If you set everything up and filled everything in, click on OK and select where you want to save it on your disk. If you are not sure how to choose between several types of compression, try them all and judge for yourself which file (video material) size suits you best in its compression quality and size.
Sound Compression
With sound compression there is the same problem as with video regarding its size if it is to be adapted for use on the web. Like video, the sound recording size can be reduced to make it suitable for web, however, once again you have to count on quality loss. To what extent this quality loss will be noticeable depends on several parameters. The first and most important is how big the record can be in its final version. Other than that, there are also less important parameters such as the type of recording etc.
A sound record on a CD for instance is in a .wav format. This format takes up a lot of space, however, it also provides the best quality. Before putting it on the web, it should be compressed. One of the important factors is whether a record is mono or stereo. Music records are stereo, which means that there is a separate record for the left and the right speaker. It is best to compress a sound record which will be used on the web into mono, which means that the left and right channels will overlap. There will be no information or quality loss; however, you will notice that both left and right speaker emit the same recording. That is useful on the web, as it reduces the size of the record by a half.
One of the better quality formats is without a doubt MP3. MP3 cuts out the unnecessary information which are not so important for listening. This provides for ten times smaller record than it originally was in a .wav format. MP3 compression allows you to choose the record quality of 32, 64, 128, 192 kHz onwards. The optimum for music is 128 kHz, which is the same quality as the sound on a CD..
Apart from MP3 record, we also know similar records such as Real Audio, Real Media, which are also good quality musical formats.
However, if you are working with a dictaphone recording etc. that you want to put on the web, it is best to use mono recording not over 32 kHz.
There are many sound processing programs, they all have similar characteristics and interface. One of those programs is also the Steinberg WaveLab. To open a file using this program, select File-Open. After that, a timeline containing the recording will open. You can listen to the recording by clicking Play (the green button) on the tool bar.

Image 1 – WaveLab interface consists of the Timeline where the recording can be seen, the toolbar and a master section where you can add different effects (the window in the lower right corner of WaveLab).

Image 2 – Toolbar. Clicking on the first icon will result in reproducing the part of the recording from where we clicked on the timeline, while clicking on the second icon will result in reproducing the whole recording from the beginning. Blue icons serve for rewinding or fast-forwarding. The first and the last icon will switch the recording to the beginning or the end, while the middle two serve for moving back and forth on the timeline. The rectangular icon is Stop, the green arrow Play, while the red circle is Record. We use this button to record a sound from one of the ports on the computer.
In order to compress the recorded or existing signal, use Convert, which you will find in the File menu, under File-Save Special-Convert

Image 3 – The smallest recording will be achieved by using the parameters shown above. It is, therefore, obligatory to use the mono format, the smallest sample rate as well as the smallest bit resolution. If you are not happy with the results, increase the sample rate and bit resolution to the desired level.
Now the record should be saved.

Image 4 – Save the acquired record through File-Save Special. Then select one of the offered formats (ACM, MP3 or WMA). These formats are equally good, although MP3 could be dubbed the most desirable, because of its worldwide use. WaveLab will ask that you select where you want to save the recording and under which name. After having selected that, you can open the recording and listen to the result. The size of the recording can be verified by rightclicking on the file and selecting Properties.
If you were not done with editing the file, save it by clicking on File-Save as. The file will then be saved as a .wav file, without compression for further editing.

