Macromedia Flash is a tool primarily used for development of web animations. It also enables development of different applications such as CD applications, screensaver base, presentation etc.
Flash is primarily a vector program, which means that it is used to manage dots or clusters of dots connected into shapes (geometrical shapes, letters…). It also offers the possibility to implement images (rasters) which then behave as objects.
Unlike raster graphics which consist of exactly defined pixels, which are hard to read on the web, vector graphics are based on mathematical functions which form curves e.g. if the shape is a circle, the element is defined by the function of circle and the colour which fills it.
The difference between vector and raster graphics is most visible when you zoom on the content of vector graphics or raster graphics. Regardless of the zoom, vector graphics will maintain the same sharpness, while raster graphics will clearly show the borders between individual pixels.
Macromedia FLASH enables the use of both raster and vector graphics, but in that case the size of files with an animation will increase by the size of interpolated raster images. 
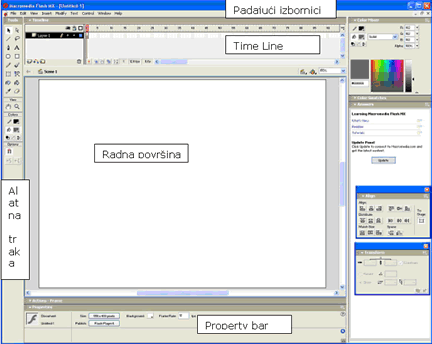
Drop-down menu line is similar in most graphic programs. File menu contains commands for operating files, Edit contains basic commands for working with objects and frames in animation. View contains commands for view setting, Insert contains commands for implementing objects on the work surface (buttons, symbols, animations...); Modify is used when working with objects, whether we want to align them, change their position or dimensions or group two or more objects; Text contains basic commands for text formatting, Control enables us to manage animations (review them on the work surface, stop or continue to play them etc.). Window and Help are standard drop-down menus which serve to manage windows and offer information about the program itself, working with the program etc. 
Time Line is a window with which we manage the animation. Animation consists of frames (pictures). There are two types of frames: Key frames – which define the initial and final state of a sequence in animation and regular frames.
Animations are divided into several groups. In order to create a complex animation, e.g. the shutting of an eye, we have to do Frame-By-Frame animation (each frame is drawn separately which results in a series of frames exchanging at certain velocity and create an animation). The most common form of animation is the so-called Tweening animation, which is created by keyframes (initial and final state). This type of animation can influence the change of dimensions, colour, transparency of an object, while changing the shape of animation (e.g. animated circle modified into a square) – it is achieved by using Shape animation.
Work surface is divided into two parts: the animation surface (white surface) whose dimensions are defined in the Property window and grey surface on which we can keep the elements of animation. All the objects within the limits of animation will not be visible in the final product.
Properties is a window which changes according to the selected object; if a text is selected it will display the options related to text editing; if an object is selected, it will display its filling, outline etc.
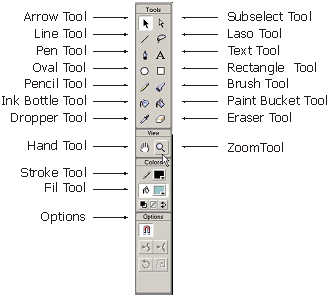
Dockers contain a number of tools which can usually be found in drop-down menus. By putting them on the Dockers line you will expedite your work and make it easier.
ANIMATION
Objects which we animate are divided into three groups: buttons, graphic elements (circles, lines, squares, different shapes etc) and animations (Movie Clips).
For easier animation management, elements are put into separate layers, which enables us to animate each of them separately. In the case two objects in the same layer overlap, they will merge into one.
Before the beginning of animation it is necessary to identify the basic parameters of animation. That is done in the Properties window where we can define the dimensions of an animation, the background colour and fps - frames per second).
After having defined the animation, we can start drawing the elements using the tools from the tool bar. Each object we draw is placed in Layer1, the only active layer. By positioning the object, changing its colours and dimensions, we created the initial phase of animation. In order to give the computer instructions that it will generate an animation on its own, we have to right click over the first frame and select Create Motion Tween. The final phase is created by right clicking over the layer we are animating abouve the frame e.g. no. 10 and select Insert Key frame from the frame.
After having created this final phase, red line above the timeline will automatically move, and at the same time final frame will appear on the work surface. If at this point you click on Enter, you will notice that the red line will go from the first to the last frame of the animation, but you will see no changes in the animation itself. That is because the initial and final frame are the same. By moving an object in the last frame, these two frames become different, and the computer will generate only the animation frames necessary to get from the initial stage to the final. If you click on Enter now, you will see the animation.
Another type of animation is Shape animation. It enables you to define the initial and final frame of the sequence (as in Motion Tween animation), but unlike Motion Tween (changing of objects’ dimensions, rotating and changing of position), Shape animation generates the morphing animation i.e. you will draw a circle on the first animation (select that frame on the timeline in the Properties window, and select Shape from the drop-down menu) and on the 10th frame draw a square, and click Enter.
This effect can be achieved with any object within the animation, if the prerequisite that that object is separated into dots is fulfilled (Explanation: if you enter text on layer 1, it becomes framed in blue, which tells us that it belongs to a group of objects which can be animated only by tween animation; if I want letter A to be morphed into the letter B, I have to select the text in the first frame and choose option Break Apart from the Modify menu, which will break the object down into dots, and then right click above the 10th frame and select Insert Empty Keyframe, enter the letter B there and break it up into dots again - Ctrl + B.)
The third type of animation is FrameByFrame animation in which each frame is drawn manually (cartoon-drawing principle before computers).
These three animation techniques enable you to develop basic animations, and for additional effects such as changes in colour, object transparency etc., use options from the Properties bar after clicking on the Keyframe of the animation (on the timeline). The window looks like this: 
If we want to have the effect of an object disappearing in the animation, it is done by clicking on the final frame’s timeline, select from the Properties Alpha option, and set the value to 0.
MANAGING ANIMATIONS Animations are managed by Actions. They contain instructions based on which animation is conducted. Actions are added to keyframes on the timeline and buttons on the animation itself. In order to create a button, you have to select New Symbol from the Insert menu. The following window will open: 
Then select Button and click OK. After confirmation, the work surface changes together with the timeline. Buttons have 4 frames on the timeline, where each frame stands for one state. The first represents what the button will look like in the animation, the second one represents what the button will look like when the cursor is on it, the third represents what it looks like when you click on it and the forth frame enables you to set the sensitive area on the button (if there is a word on the button, you can set that the button activates only on certain letters or one part of the object, by drawing a mouse-sensitive area in the 4th frame). After having defined all four frames in the timeline of the button, click on Scene1 (under the timeline).

When we return to the work surface we will not see the newly created button, since it is now in the Library area. We can open this area by Ctrl + L command. Drag & drop the button from that area to the work surface, after having previously opened a new layer in which you can animate just that button.
A button behaves just like any other object and can be animated with Tween animation. In order to enable the users to manage the animation, you only have to add instructions (actions) to that button which will tell the animation how to behave or evolve.
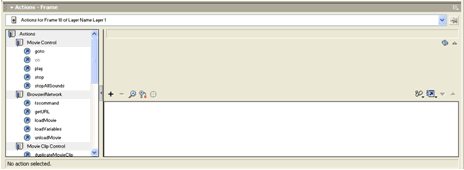
Actions can be put only on keyframes on the timeline. After having selected e.g. the last keyframe and choosen Actions from the Window menu, the following window will open: 
On the left side of the window there are preset commands which you can use to tell the animation how to behave on the keyframe which you selected and opened in the Sections window. Basic actions are stop, play, go to i go to and play. If we put the Stop action on this last frame, it will stop there. Otherwise, if there is no action on the last frame, it will be reset and start over.
Once animation stops, the only thing that enables a user to restart it are buttons and actions on them. In order to add an action to a button, you have to select it and open the Actions window by pressing F9 key. On the left side of the window select the Play command, which is then added to the right side of the window (where we can see part of the animation code). Another thing you can define are the conditions the action will activate in. That can be done by clicking on the code line – Release – after which you are offered other options for possible activation. After having chosen e.g. option Press, you have given the animation instructions which say: in case the user clicks on this butoon, animation will restart (from frame no. 1) until it reaches the action on timeline which says Stop. In order to test an animation press Ctrl + Enter which will activate Flash player which will then play your animation along with all the elements and actions you built into it. If the result is satisfactory, the animation should be saved in the format which can be implemented into a web page.
Flash uses two main file extensions. Basic (open) file extension is *.fla which contains all the information on the process of animation development, with all the layers, library and actions which can be additionally changed etc. On the other hand, there is also .swf file which contains only the animation which is played according to defined actions, but no data on these actions, layers etc.
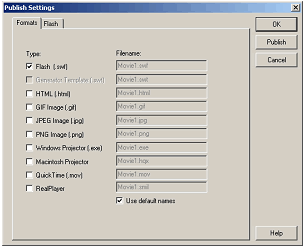
In order to create a .swf file, choose Publish from the File menu. 
This is where you select which format you want to export your animation to. If you intend to build it into a web page, use swf, name the file and click on Publish. The newly created file is in the same folder as the open file you saved. A finished animation is further on used in web design programs such as Dreamweaver, Front Page etc.
WORKING WITH OTHER FILES
It is possible to import files created in other applications into Flash animations. Files incorporated into animations are most often images in different formats.
In order to import an image into an animation, chose Import from the File menu and select the file that you want to import.
After being imported, Flash puts the image on the work surface and into the library. If you click twice above the image in the Library window, a window will open describing the characteristics of the image.
|

